Before You Begin
Before diving into contact management, ensure you have the following:
- A Constant Contact V3 API developer account and a registered application in the Developer Portal.
- OAuth2 authentication is configured for your integration.
- Ensure your application is authorized to access the necessary scopes (contacts:write, contacts:read, etc.).
Understanding Permissions to Send
It’s crucial to adhere to US and international anti-spam laws. Here’s what you need to know:
- “Permission to send” indicates the relationship between an account owner and a contact.
- Adding a contact without their explicit consent is a serious violation of anti-spam laws and Constant Contact’s Terms of Service.
- The
permission_to_sendproperty for contacts importing using a bulk activity endpoint defaults toImplicit. This means you are acknowledging you have permission to contact them. - Use the POST
/contacts/sign_up_formendpoint only when contacts have provided explicit permission to receive emails or SMS messages. This method both adds new contacts and updates existing ones.
The Contact Object
The contact object is composed of core properties and subresources. By default, V3 API response payload includes only the core properties. Contacts are identified by a unique email address or SMS number (or both).
The contact properties and subresources returned in the results vary depending on the contact endpoint you use. The following is an example JSON response when making a GET call to the /contacts/{contacts_id} endpoint.
Example Contact Object (JSON)
{
  "contact_id": "1898ae62-4752-11e9-9c8a-fa163e6b01c1",
  "email_address": {
    "address": "dlang@example.com",
    "permission_to_send": "unsubscribed",
    "created_at": "2022-01-03T10:53:04-05:00",
    "updated_at": "2022-03-03T10:56:29-05:00",
    "opt_in_source": "Contact",
    "opt_in_date": "2022-01-23T13:48:44.108Z",
    "opt_out_source": "Contact",
    "opt_out_date": "2024-01-23T13:48:44.108Z",
    "opt_out_reason": "I am no longer interested in getting emails.",
    "confirm_status": "confirmed"
   },
  "first_name": "Debora",
  "last_name": "Lang",
  "job_title": "Musician",
  "company_name": "Acme Corp.",
  "birthday_month": 11,
  "birthday_day": 24,
  "anniversary": "2006-11-15",
  "update_source": "Contact",
  "create_source": "Account",
  "created_at": "2022-01-23T13:48:44.108Z",
  "updated_at": "2022-01-23T13:48:44.108Z",
  "deleted_at": "2022-07-08",
  "custom_fields": [],
  "street_addresses": [],
  "list_memberships": [
     "07936f78-662a-11eb-af0a-fa163e56c9b0"
   ],
"taggings": [
  "e7ddac60-51da-11eb-b3a4-fa163e6b01d5"
],
"notes": [
  {
    "note_id": "35043c66-afac-11e9-8077-fa163e56c9b0",
    "created_at": "2021-07-26T13:49:37Z",
    "content": "Contact unsubscribed."
  }
],
"sms_channel": {
  "sms_channel_id": "3fa85f64-5712-6245-b3fc-2c963f66bfc7",
  "sms_address": "1115551212",
  "dial_code": "1",
  "country_code": "US",
  "update_source": "Contact",
  "create_source": "Account",
  "sms_channel_consents": [
    {
      "sms_consent_permission": "explicit",
      "consent_type": "promotional_sms",
      "opt_in_date": "2022-01-23T13:48:44.108Z",
      "opt_out_date": "",
      "advertised_frequency": "1",
      "advertised_interval": "monthly",
      "created_at": "2022-01-23T13:48:44.108Z",
      "updated_at": "2023-01-23T13:48:44.108Z"
    }
   ]
 }
}
Contact Features
Tags and custom fields help you organize and personalize your contact data. You can create them before or after importing contacts, but they must exist in your account beforehand to be included during import.
Tags
Use tags to identify subsets of contacts for specific marketing campaigns without requiring you to create and manage new lists. Tag names are not visible to contacts and apply directly to contacts, independent of list membership.
Limits:
- Maximum 500 tags per account.
- Tag names: 1-255 characters, unique, alphanumeric, spaces, and common keyboard symbols (except < and >).
Custom Fields
Custom fields store additional contact information for personalized email campaigns. Each custom field has a unique name and data type (text or date). For example, you can create a custom field to store a contact’s nickname or favorite author.
When importing custom fields, ensure the names in your CSV match the names in your account.
Custom Field Limits:
- Maximum 100 custom fields per account.
- Maximum 50 custom fields per contact.
- Maximum 50 characters in a
custom_fieldname.
Contacts Get Started Workflow
The following illustrates the basic steps within the contacts workflow.
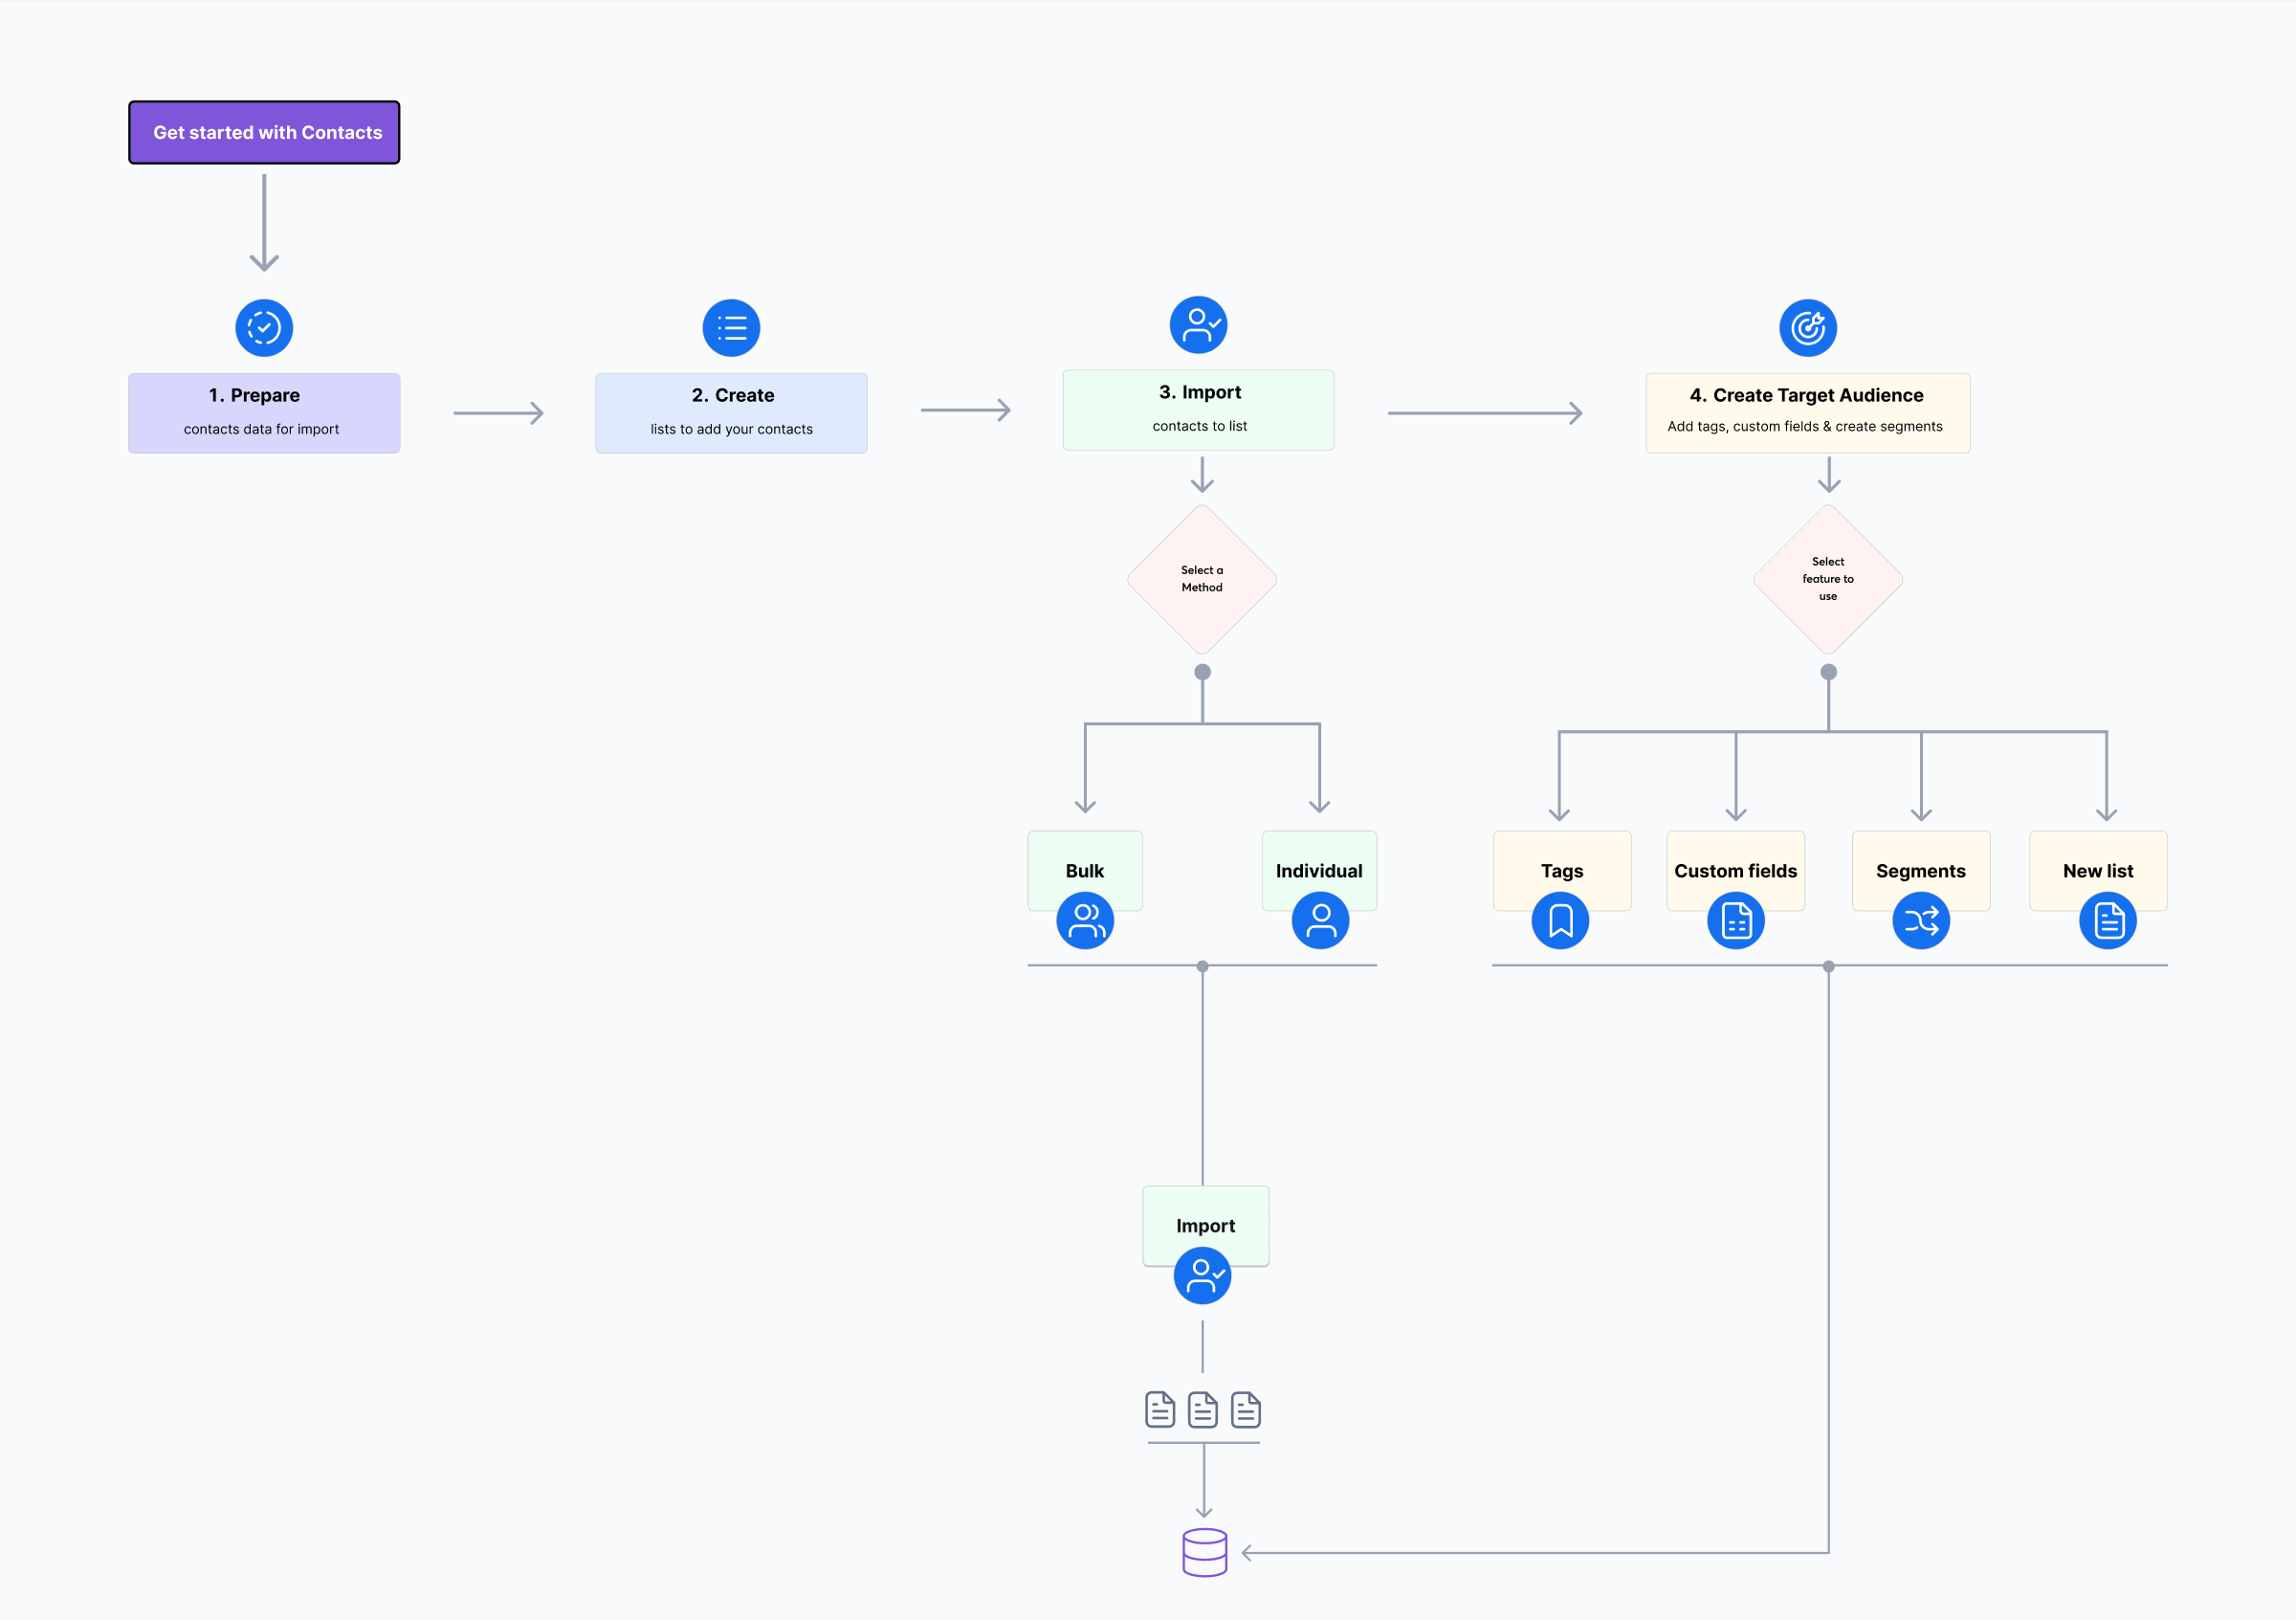
Let’s get started!
Step 1: Prepare Contact Data
You can import contacts individually or in bulk. If importing contacts in bulk, you can either use a JSON payload or a comma-separated value (CSV) file. But first, you must prepare the contact data for import. This includes:
- Remove duplicate contacts from your source before importing.
- Use supported column names.
- Ensure all email addresses are valid to avoid high bounce rates, which can negatively impact your sender reputation.
- Include only active and engaged contacts. Email Service Providers (ESPs) consider engagement rates when determining whether to deliver your emails.
- Verify all contacts have a unique email address or SMS number.
- Save your CSV file with UTF-8 encoding to ensure proper handling of various characters.
Click here to download an example CSV file.
Step 2: Create the Primary Contact List
Lists help you organize contacts based on shared characteristics (interests, job industry, location, etc.).
Use your primary contact list to manage all contacts and to sync with secondary data sources.
To create a primary contact list, make a POST call to the /contact_lists endpoint with the following in the request body:
name: A unique name (e.g.,Primary).favorite: (Optional) Set totrueto display a list more prominently in the integration’s list view. Default isfalse.description: A brief list description (up to 255 characters).
The API response will contain a unique list_id, which you’ll need later.
Step 3: Import Contacts
Constant Contact provides bulk import options for adding up to 39,999 contacts with a single API call or single contact import methods. Bulk import method create an asynchronous background job that adds new contacts or updates existing contacts. Importing an existing contact only updates the contact properties you include in the request.
Limits for Bulk Import:
- Number of contacts:
- CSV: Maximum 40,000 rows (39,999 contacts + 1 header row).
- JSON: Maximum 40,000 contacts.
- CVS file size: Less than 4 MB.
Select the Import Method
Use a CSV File
-
Create the CSV import file with contact properties as headers and contact data as rows. The file must include an
emailand/orsms_numberheader. -
Make a POST call to the
/activities/contacts_file_importendpoint with a multipart/form-data request. Include the following parameters:file- The CSV file.list_ids- An array of one or more list_id values (maximum 50).sms_permission_to_send- Use to set SMS permissions at the file level for all contacts with SMS numbers.
explicit: All contacts provided explicit SMS permission. Ifexplicit, you must also include thesms_consent_dateas a column header to specify the date the contact consented to receiving SMS messages.not_set<\strong>: Contacts have not provided consent. You must obtain explicit permission before sending SMS messages. * The Content-Type header should be unspecified.
Use a JSON Request Body
- Make a POST call to the
/activities/contacts_json_importendpoint. The request body should be a JSON object with the following properties:import_data- Required. An array of contact objects. Each object must contain an email_address and/or sms_number. If includingsms_number, you must also includesms_permission_to_send.list_ids: Required. Array of contact list ids (up to 50) to which you want to add all imported contacts.sms_permission_to_send: If including ansms_number, specify:explicit: Contact provided explicit permission;sms_consent_dateis also required.not_set: SMS permission not obtained;sms_consent_dateis not required.
Import One Contact at a Time
To create a single contact, select from the methods that follow.
-
Make a POST call to the
/contactsendpoint. Learn more -
If a contact has given you explicit permission to send them emails, use the
/contacts/sign_up_formendpoint to create a single contact or update an existing contact. This endpoint does not require you to make a separate API call to check if the contact email address or SMS number already exists in the account. Learn more
Check the Import Activity Status
Bulk import methods are asynchronous. Make a GET call to the /activities/{activity_id endpoint to check the activity status. Try it!
Verify Contact List Membership
-
To verify contacts were successfully imported to your primary list, make a GET call to
/contactsand specify the primarylist_idfor thelist_membershipparameter. The response lists and returns details for each contact on the specified contact list. Try it! -
To get details about a specific contact, make a GET call to the
/contacts/{contacts_id}endpoint and specify thecontact_id. Try it!
What’s Next?
Use the endpoints that follow to maintain contacts in your account.
Delete Contacts
- Delete contacts one at time by making a DELETE call to the
/contacts/contact_idendpoint. Learn more - Bulk delete 500 or more contacts, use the delete contacts bulk activity endpoint. Learn more
Add or Update a Single Contact
To either add a new contact or update an existing contact’s details, make a POST call to the /contacts/sign_up_form endpoint. Only use this method when a contact gives you explicit permission. Learn more
To update an existing contact’s details, make a PUT call to the /contacts/contact_id endpoint. Learn more
Add and Remove Contacts from Lists in Bulk
Add and remove contacts from lists or delete lists using the list management bulk activity endpoints.
- Add contacts to lists:Learn more
- Remove contacts from lists: Learn more
- Delete lists: Learn more
Sync Contacts
Learn how to keep contact data synchronized between different sources. Learn more
Get Contact Consent Counts
To get insights about the current consent state of all contacts in your account, make a GET call to the /contacts/counts endpoint. Optionally, to include the total number of new subscribers in the results, specify new_subscribers in the include query parameter. Learn more
Contact Related Features
Learn how to use product features that will enable you to target the right contacts for a particular campaign.